How to Build an Astrology App with AstroAPI
Building an astrology application used to require deep knowledge of astronomical calculations, ephemeris data, and complex mathematics. With AstroAPI, you can skip all of that and focus on what matters most: creating a great user experience.
In this tutorial, we’ll build a complete astrology web page from scratch - a page where someone enters their birth details and instantly sees their natal chart with planetary positions, a visual chart wheel, and their daily horoscope. No prior API experience is needed.
What You’ll Need
- An AstroAPI account (sign up for free)
- An API key (available from your dashboard)
- A text editor (VS Code, Sublime Text, or even Notepad)
- A web browser
That’s it - no frameworks, no build tools, no terminal commands. We’ll write everything in a single HTML file.
Step 1: Get Your API Key
After signing up, head to your dashboard. Your API key is like a password that identifies your app to AstroAPI - you’ll need it for every request.
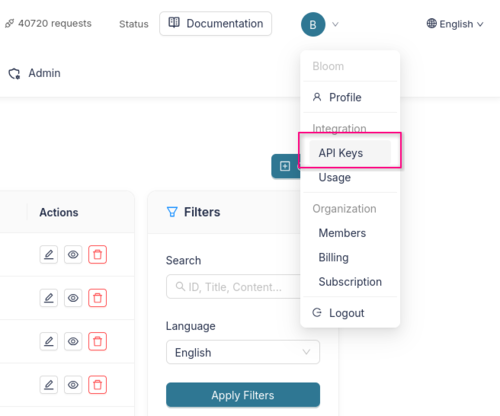
Finding the API Keys page
In the top-right corner of the dashboard, click on your profile icon. A dropdown menu will appear. Under the Integration section, click API Keys.
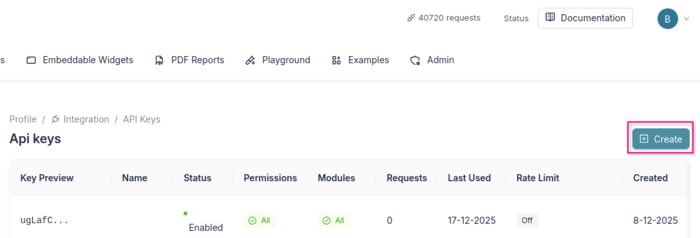
This brings you to the API Keys overview. You’ll see a navigation bar showing your current path: Profile > Integration > API Keys. Click the Create button in the top-right corner to make a new key.
Creating your key
On the Create page, you’ll see a form with several sections:
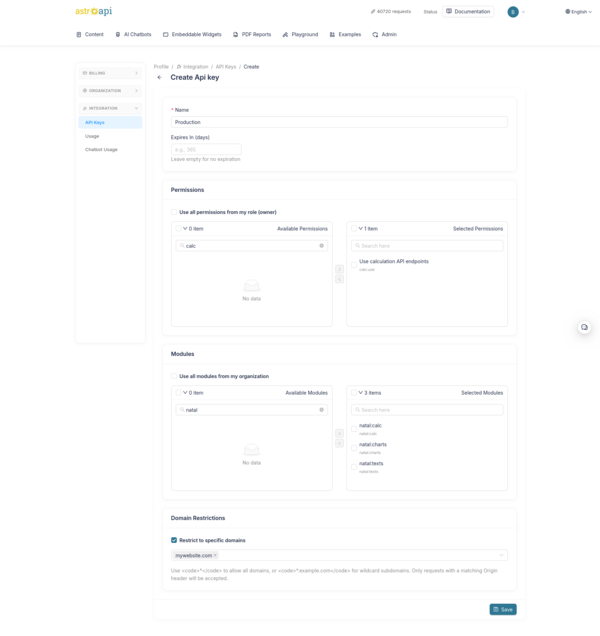
- Name - Give your key a recognizable name (e.g. “My Astrology App” or “Production”).
- Expires In (days) - Optionally set an expiration. Leave empty if the key should last indefinitely.
- Permissions - Select which API features the key can access. For this tutorial, you’ll need at least the calculation permissions (
calc). You can check “Use all permissions from my role” to keep things simple. - Modules - Choose which modules the key can use. For this tutorial, select the natal modules (
natal:calc,natal:charts,natal:texts). You can also check “Use all modules from my organization” to allow everything. - Domain Restrictions - This one is important. Since your API key will be visible in the page’s source code (anyone can see it via the browser’s developer tools), you should restrict it to your own domain. Enter your website’s domain (e.g.
mywebsite.com) so that only requests coming from that domain are accepted. That way, even if someone copies your key, they can’t use it on their own site. For local development, you can use*temporarily.
Click Save and your new API key will appear. Copy it and keep it somewhere safe - you won’t be able to see the full key again.
Step 2: Create Your HTML Page
Open your text editor and create a new file called astrology.html. We’ll start with a basic page that has a form for birth details:
<!DOCTYPE html>
<html lang="en">
<head>
    <meta charset="UTF-8">
    <meta name="viewport" content="width=device-width, initial-scale=1.0">
    <title>My Astrology App</title>
    <style>
        body {
            font-family: Georgia, serif;
            max-width: 800px;
            margin: 0 auto;
            padding: 2rem;
            background: #f5f0e8;
            color: #1a1a1a;
        }
        h1 { text-align: center; }
        form {
            background: white;
            padding: 2rem;
            border-radius: 8px;
            margin-bottom: 2rem;
        }
        label { display: block; margin-bottom: 0.5rem; font-weight: bold; }
        input, select {
            width: 100%;
            padding: 0.5rem;
            margin-bottom: 1rem;
            border: 1px solid #ccc;
            border-radius: 4px;
            font-size: 1rem;
        }
        button {
            background: #ba9a63;
            color: white;
            border: none;
            padding: 0.75rem 2rem;
            font-size: 1rem;
            border-radius: 4px;
            cursor: pointer;
        }
        button:hover { background: #a8894f; }
        .results { background: white; padding: 2rem; border-radius: 8px; }
        .planet-row {
            display: flex;
            justify-content: space-between;
            padding: 0.5rem 0;
            border-bottom: 1px solid #eee;
        }
        .planet-name { font-weight: bold; }
        .planet-sign { color: #ba9a63; }
        #chart-image { text-align: center; margin: 2rem 0; }
        #chart-image svg { max-width: 100%; height: auto; }
        .horoscope-box {
            background: #f9f3e5;
            padding: 1.5rem;
            border-left: 4px solid #ba9a63;
            border-radius: 0 8px 8px 0;
            margin-top: 1.5rem;
            line-height: 1.8;
        }
        .loading { text-align: center; color: #6b6b75; font-style: italic; }
        .hidden { display: none; }
    </style>
</head>
<body>
    <h1>✨ My Astrology App</h1>

    <form id="birth-form">
        <label for="name">Your Name</label>
        <input type="text" id="name" placeholder="e.g. Anna" required>

        <label for="date">Date of Birth</label>
        <input type="date" id="date" required>

        <label for="time">Time of Birth</label>
        <input type="time" id="time" required>

        <label for="city">City of Birth</label>
        <input type="text" id="city" placeholder="e.g. Amsterdam" required>

        <button type="submit">Calculate My Chart</button>
    </form>

    <div id="results" class="results hidden">
        <!-- Results will appear here -->
    </div>

    <script>
        // We'll add our code here in the next steps
    </script>
</body>
</html>
Save the file and open it in your browser. You should see a clean form asking for birth details. It doesn’t do anything yet - let’s fix that.
Step 3: Look Up the Birth Location
When someone types “Amsterdam” we need to convert that into latitude and longitude coordinates. AstroAPI has a geocoding endpoint for this:
const API_KEY = "your-api-key-here";
const BASE_URL = "https://api.astroapi.cloud/api";
Protecting your API key: Because this is a client-side web page, your API key is visible to anyone who views the page source. This is fine as long as you have set up Domain Restrictions in the dashboard (see Step 1). The API will reject requests from any domain that isn’t on your allow list, so the key is useless to anyone who copies it.
Now let’s write the functions. First, the location lookup:
async function findLocation(cityName) {
    const response = await fetch(
        `${BASE_URL}/geocoding/search?q=${encodeURIComponent(cityName)}`,
        { headers: { "X-Api-Key": API_KEY } }
    );
    const data = await response.json();

    // The API returns a list of matching places.
    // We'll use the first result.
    const place = data.data[0];
    return {
        latitude: place.latitude,
        longitude: place.longitude,
        timezone: place.timezone,
        name: place.name
    };
}
This turns “Amsterdam” into { latitude: 52.37, longitude: 4.89, timezone: "Europe/Amsterdam", name: "Amsterdam" } - exactly what we need for chart calculations. The timezone is important because AstroAPI needs it to correctly convert your local birth time to universal time.
Step 4: Calculate the Natal Chart
Now let’s send the birth data to AstroAPI and get back all the planetary positions:
async function calculateChart(birthDate, birthTime, latitude, longitude, timezone) {
    const response = await fetch(`${BASE_URL}/calc/natal`, {
        method: "POST",
        headers: {
            "Content-Type": "application/json",
            "X-Api-Key": API_KEY
        },
        body: JSON.stringify({
            dateTime: `${birthDate}T${birthTime}:00`,
            location: { latitude, longitude, timezone },
            houseSystem: "placidus",
            includeReadableEntities: true
        })
    });

    return await response.json();
}
The dateTime is sent as an ISO string (e.g. "1990-06-15T14:30:00") and the location includes the timezone so the API can correctly interpret the local birth time. The response contains everything about the chart: where each planet was positioned, which zodiac sign it was in, which house it occupied, and all the geometric relationships (aspects) between planets.
Step 5: Display the Results
Here’s where it gets exciting. Let’s turn the raw API data into something visually appealing. We’ll show a table of planetary positions and the person’s Sun, Moon, and Rising signs - the “big three” that most people are curious about:
function displayChart(chart, personName) {
const points = chart.data.points;
const houses = chart.data.houses;
// Find the "big three"
const sunSign = points.sun.signTitle;
const moonSign = points.moon.signTitle;
const risingSignId = houses.cusps[0].sign;
const risingSign = risingSignId.charAt(0).toUpperCase() + risingSignId.slice(1);
let html = `
<h2>${personName}'s Birth Chart</h2>
<div style="text-align:center; margin-bottom:2rem;">
<p style="font-size:1.2rem;">
☀️ Sun in <strong>${sunSign}</strong> ·
🌙 Moon in <strong>${moonSign}</strong> ·
⬆️ Rising <strong>${risingSign}</strong>
</p>
</div>
<h3>Planetary Positions</h3>
`;
// Build a row for each planet
const planetKeys = ["sun", "moon", "mercury", "venus", "mars",
"jupiter", "saturn", "uranus", "neptune", "pluto"];
for (const key of planetKeys) {
const planet = points[key];
if (!planet) continue;
html += `
<div class="planet-row">
<span class="planet-name">${key.charAt(0).toUpperCase() + key.slice(1)}</span>
<span class="planet-sign">${planet.signTitle} ${planet.degreesInSign.toFixed(1)}°</span>
<span>House ${planet.houseNumber}</span>
</div>
`;
}
document.getElementById("results").innerHTML = html;
document.getElementById("results").classList.remove("hidden");
}The API returns planets as an object keyed by planet ID (e.g. points.sun, points.moon). Each planet has a sign (like "gemini"), signTitle (display name like "Gemini"), degreesInSign (position within that sign), and houseNumber. The Rising sign (Ascendant) comes directly from the sign property on the first house cusp.
Step 6: Add a Visual Chart Wheel
A natal chart really comes alive with the classic circular chart wheel. AstroAPI generates these as SVG images that look crisp at any size:
function displayChartImage(chartUrl) {
    const chartDiv = document.createElement("div");
    chartDiv.id = "chart-image";
    chartDiv.innerHTML = `<h3>Your Chart Wheel</h3><img src="${chartUrl}" alt="Natal Chart" style="max-width:100%; height:auto;">`;
    document.getElementById("results").appendChild(chartDiv);
}
The natal chart API response already includes a chart.url field with the URL to the SVG chart image, so no separate request is needed. We simply pass that URL to an <img> tag to display the chart wheel with all 12 zodiac signs, houses, planet positions, and aspect lines.
Need a PNG image instead - for example, to share on social media? Just change the .svg extension in the URL to .png.
Step 7: Show the Daily Horoscope
Let’s add a personal touch by showing today’s horoscope for the person’s Sun sign:
async function displayHoroscope(sunSign, sunSignTitle) {
    const today = new Date().toISOString().split("T")[0];

    const response = await fetch(
        `${BASE_URL}/horoscope/daily/${today}?sign=${sunSign}&language=en`,
        { headers: { "X-Api-Key": API_KEY } }
    );

    const data = await response.json();
    const signName = sunSignTitle;

    const horoscopeDiv = document.createElement("div");
    horoscopeDiv.innerHTML = `
        <h3>Today's Horoscope for ${signName}</h3>
        <div class="horoscope-box">${data.data.text}</div>
    `;
    document.getElementById("results").appendChild(horoscopeDiv);
}
The horoscope endpoint takes today’s date in the URL and the zodiac sign as a query parameter. Horoscopes are available in multiple languages - just change language=en to language=nl for Dutch, language=es for Spanish, language=fr for French, and so on.
Step 8: Wire It All Together
Now let’s connect the form to all our functions. Add the following code to your <script> section, after all the functions from the previous steps:
const API_KEY = "your-api-key-here";
const BASE_URL = "https://api.astroapi.cloud/api";

document.getElementById("birth-form").addEventListener("submit", async (e) => {
    e.preventDefault();

    const name = document.getElementById("name").value;
    const date = document.getElementById("date").value;
    const time = document.getElementById("time").value;
    const city = document.getElementById("city").value;

    // Show a loading message
    const results = document.getElementById("results");
    results.innerHTML = '<p class="loading">Calculating your chart...</p>';
    results.classList.remove("hidden");

    try {
        // 1. Find the coordinates and timezone for the birth city
        const location = await findLocation(city);

        // 2. Calculate the natal chart
        const chart = await calculateChart(date, time, location.latitude, location.longitude, location.timezone);

        // 3. Display the planetary positions
        displayChart(chart, name);

        // 4. Add the visual chart wheel using the URL from the API response
        if (chart.data.chart?.url) {
            displayChartImage(chart.data.chart.url);
        }

        // 5. Show today's horoscope based on the Sun sign
        const sunSign = chart.data.points.sun.sign;
        await displayHoroscope(sunSign, chart.data.points.sun.signTitle);

    } catch (error) {
        results.innerHTML = '<p style="color:red;">Something went wrong. Please check your API key and try again.</p>';
    }
});
Open the file in your browser, fill in a birth date and city, and click “Calculate My Chart.” Within a couple of seconds, you’ll see the full natal chart data, a beautiful chart wheel, and a personalized horoscope - all powered by AstroAPI.
Going Further: Compatibility, Moon Phases, and More
Now that you have a working astrology app, here are some features you could add next:
Love compatibility - Use the synastry endpoint to compare two birth charts. Show which planets form harmonious aspects (trines, sextiles) and which create tension (squares, oppositions). Great for a “relationship compatibility” feature.
Moon phase tracker - The moonphase endpoint returns the current lunar phase, illumination percentage, and moonrise/moonset times. Perfect for a sidebar widget or daily update.
Transit alerts - Transits show where the planets are right now compared to someone’s birth chart. Use this to build “what’s happening in your chart today” features - for example, “Saturn is crossing your Midheaven, a time for career breakthroughs.”
Numerology - Calculate life path numbers, expression numbers, and personality numbers from a person’s birth date and name. A nice complement to the astrological data.
Multi-language support - All text-based endpoints (horoscopes, interpretations) support multiple languages. Build for a global audience by passing the lang parameter.
Server-side proxy - For production apps, consider moving your API calls to a small backend server. This way your API key stays on the server and is never exposed to users at all. Domain Restrictions are a good first line of defense, but a proxy gives you full control.
Explore the Full API
What we’ve covered here is just the beginning. The full API documentation covers every endpoint in detail, with request examples in cURL, JavaScript, and Python.
Ready to start building? Create your free account and get your API key today.